Using the Search Feature
Every RateLinx application contains a robust Search feature. This feature works the same whether you are looking for a specific product in RateLinx or trying to find a specific ticket in Issue Tracker.
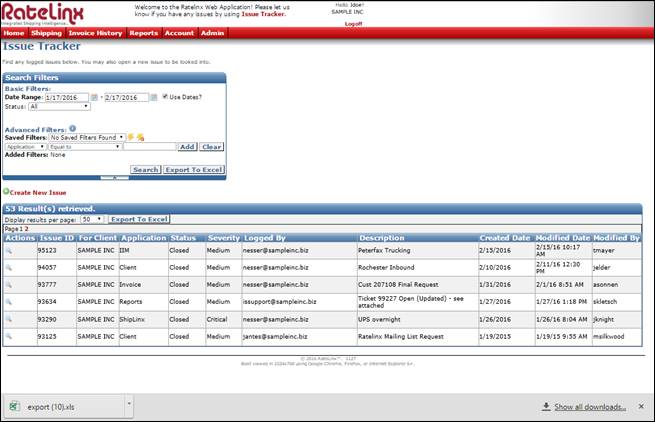
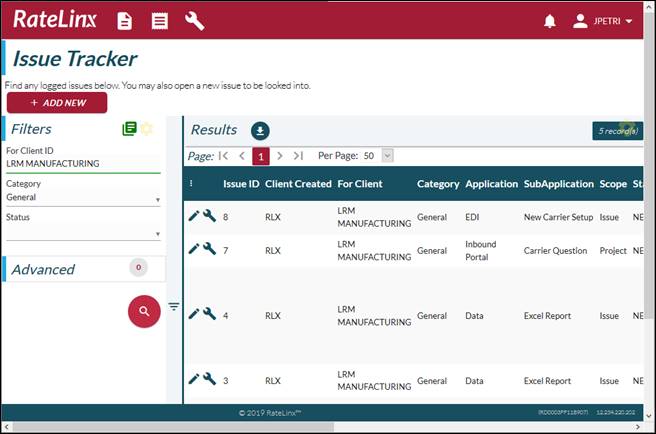
Each search, regardless of application, starts with a basic Search page. Because we'll be using Issue Tracker as our sample search, we'll begin with Issue Tracker's page; our example is for a fictional customer and shows all entries, or "records", for one month:
In areas where you don't have a lot of records, such as this fictional customer, a one-month search may be just fine. For other customers, however, it may show too many records to be useful. Additionally, you may want to see a specific set of records: say, all open tickets, all tickets logged for a specific application, etc. For these kind of searches, you need something more specific. You need a Filter.
Restricting the Search
A filter is a way for you to restrict the number of results that a search finds. There are two types of filters: Basic and Advanced.
Basic Filter
A basic filter is the easiest way to restrict the information you see: it often lets you select a range of dates and usually contains at least one field considered to be the most useful way to filter the data.
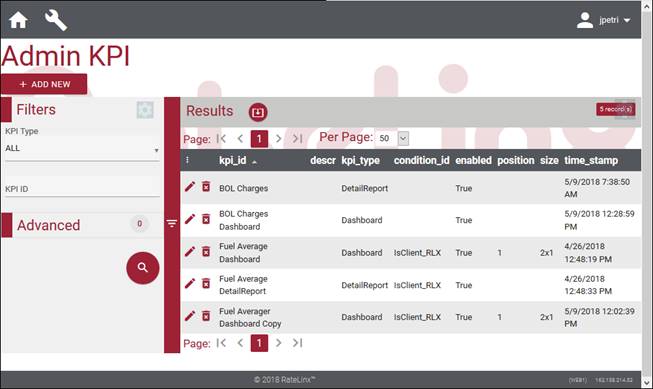
In this example, the basic filters are Client ID and KPI Category:
Client ID is a text field while Category is a dropdown list. Both fields work on the all-or-nothing principle: the system finds all records that match the exact text typed into a text field and the exact option selected from the dropdown list.
In cases like that above, a record must contain both the Client ID AND the Category used as filters. You can use the Advanced filters to create filters within the records returned by the Basic search OR to search for records that contain information in different fields.
Advanced Filter
This type of filter can build upon the basic filter by letting you further restrict the number of records found by the Basic filter. This means that Advanced filters are cumulative to Basic filters. In order words, the Advanced filter is added to the Basic filter.
In other cases, you can use an Advanced filter independently of the basic filter and, in some applications, you can save Advanced filters for use in a later session.
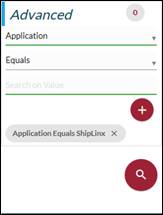
If you click on the Advanced heading area, the Filter pane expands to show the Advanced options. There are three parts to an Advanced filter:
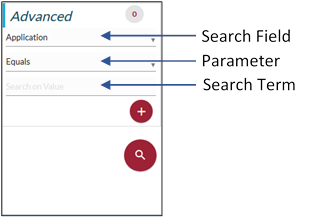
The Search Field is the container for the information you're looking for: Application, Severity, and Status are all examples of Search Fields. These fields are also used as headings on the Search results.
The Search Term is what you'e looking for: the application name, the degree of severity, the type of status.
The Parameter is the thing that ties the Search Field and Search Term together. Is the application name "ShipLinx"? Is the Severity "Critical"? Is the status "Closed"?
When you create an Advanced filter, you must select a field and a parameter and then enter a term for the Search to look for.
Note: After you select the Field and Parameter and enter the Term
for your filter, you must click the Add icon (![]() )
to add the filter to your search. The system adds the filter to the pane:
)
to add the filter to your search. The system adds the filter to the pane:
Filter parameters
As noted above, RateLinx Search requires that you use a parameter to specify how you want your advanced filter to work.
When you click on the middle field in the Advanced Filters area, RateLinx opens the Parameters dropdown list:
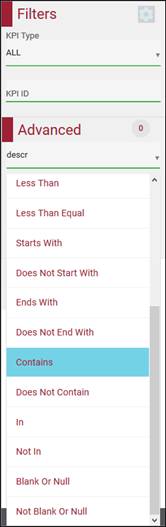
You can add any of these to your Search; the most useful are explained below:
|
|
Option |
Information found |
|
|
Equals |
Include only those records with a value that exactly matches the Search Field. The value can be either a letter or number. |
|
|
Not Equals |
Include all records with values that do NOT exactly match the Search Term. The value can be either a letter or number. |
|
Used with Numbers |
Between |
|
|
Not Between |
|
|
|
Greater Than |
Include only those records with a value greater than the Search Term. |
|
|
Greater Than Equal |
Include only those records with a value greater than or equal to the Search Term. |
|
|
Less Than |
Include only those records with a value less than the Search Term. |
|
|
Less Than Equals |
Include only those records with a value less than or equal to the Search Term. |
|
|
|
Starts With |
Include all records where the value begins with the Search Term. |
|
|
Does Not Start With |
Include all records where the value does not begin with the Search Term. |
|
|
Ends With |
Include all records where the value ends with the Search Term. |
|
|
Does Not End With |
Include all records where the value does not end with the Search Term. |
|
|
Contains |
Include all records where the value contains the Search Term. This is usually used with fields like Description. Do not put quotation marks around the Search Term. |
|
|
Does Not Contain |
Excludes all records where the value contains the Search Term. This is usually used with fields like Description. Do not put quotation marks around the Search Term. |
|
|
In |
|
|
|
Not In |
|
|
|
Blank or Null |
Include only records where the value is missing. |
|
|
Not Blank or Null |
Include all records where the value is not missing. |
Using Filters
You create basic and advanced filters differently. To set a basic filter, you enter or select the information you want to use to restrict the search. Advanced filters must be physically added to the search to be valid.
To create a basic filter
· If you want to set a date range, just click in the appropriate date field and type the date you want to search by. Alternatively, you can click on the Date icon and pick the proper date.
· If you want to restrict the results by a specific value of the most-useful data field, click on that field and select the Search Term from the dropdown list.
To create an advanced filter
1. Click on the Advanced heading in the Filters pane.
2. Click on the field that you want to search by.
3. Click in the Parameters field.
RateLinx opens the parameter dropdown list. Click on the parameter that best suits the information stored in the Search Field.
4. Click in the Search Term field and enter the appropriate value.
5. Click Add.
The system adds the filter to the Advanced Filter area. Remember that the Advanced filter works in association with the Basic Filter, shown here set up to show all KPIs.
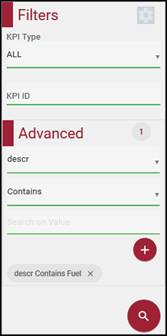
6. Create another advanced filter or click on the View icon.
The filter you've created remains available until you remove it or leave the Search Page. In some procedures, you can also save the filter for future use.
Exporting Search Results to Excel
Some procedures allow you to save the filtered results to an Excel spreadsheet.
1. Using basic and/or advanced filters, create and run a search.
RateLinx displays the search results underneath the Search Filters pane.
2. Click Export to Excel.
The file is immediately exported to your computer's default Downloads folder. This is typically found on your computer's hard drive. The filename is always export (n).xls, where n is a number. For example, export (1).xls or export(12).xls. The number used depends on the number of export files that you already have in your Downloads folder.
The export file usually appears at the bottom of your browser window: